If you have any questions afterreading the documentation, that are beyond the scope of this help file, please open a ticket on the dedicated support site, it’ll be processed as soon as possible!
Getting Started
Uploading the Theme
Method 1: To upload the theme you need to extract the downloaded zip file. Once extracted you’ll see a file named stoked.zip. Go to Appearance → Themes and click upload. Select the stoked.zip file on your hard disk.
If you are migrating from another theme, you need to resize all the images and thumbnails to the right size. Fastest way to do this is by using the Force Regenerate Thumbnails plugin, simply install, navigate to Settings → Force Regenerate Thumbnails and run it. Job done.
Customizations Tips
Before you attempt any customization please get familiar with one of the web inspectors. In the end you will save a huge amount of time. If you are on Chrome it is already installed, simply right-click on the element you want to change and select Inspect Element or press F12. If you are using Firefox you can install the Firebug add-on.
When you open it you will see two panes. The markup is on the left with the CSS on the right. Once you target the element you want to change, you have access to all CSS right there in the browser. Once you change a CSS property you can see the results instantly.
Once you’ve figured out what elements you want to change, you can paste those changes into the “Custom CSS” box in Appearance → Customizer → Advanced tab. If you edit the actual CSS files then you might have some issues when you upgrade the theme. Keeping your CSS customizations in the theme options will keep them nice and safe.
Importing Demo Data
When installing the theme, you’ll be prompted with several recommended plugins you can install which the Stoked! fully supports. One of them is One Click Demo Import plugin.
This plugin will allow you to quickly edit everything instead of creating content from scratch. When you import the data following things will happen:
No existing posts, pages, categories, images, custom post types or any other data will be deleted or modified.
Posts, pages, some images, some widgets and menus will get imported.
Images will be downloaded from our server, these images are copyrighted and are for demo use only.
Install the plugin and activate it
Move to Appearance → Demo Data
Select the desired demo install you want to emulate
Click Yes, import! button
Wait for the import to finish.
Creating The Homepage
Stoked! is a blog/magazine theme so it will always display latest posts on the homepage. However you have to methods to achieve this:
Method 1: Display Latest Posts
This is the simplest setup:
Move to Settings → Reading
In Front page displays select Your Latest Posts
Set how many Blog pages show at most ( posts per page / load more button click )
Set all additional options using global settings trough the Customizer in Appearance → Customizer
Method 2: Setting Homepage as a ‘Page’
Alternatively, in order to have more control over homepage-specific settings, you might want to set up your homepage to be a static page.
This is also useful in case you want to set up multiple homepages (or home-like pages. This is the method we use to showcase live demos for example).
Move to Pages → Add New
Enter the page title (e.g. “Homepage”)
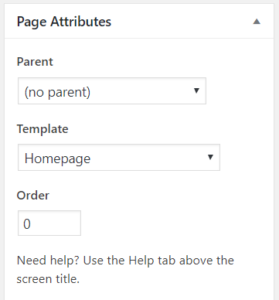
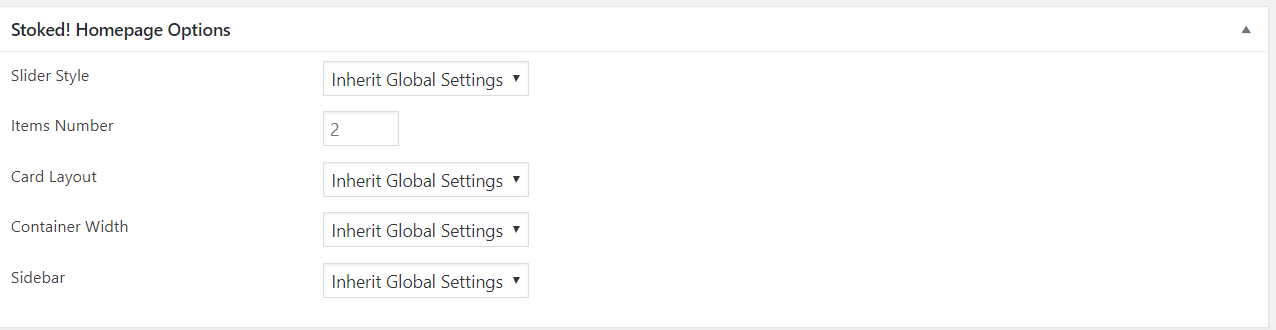
In the Page Attributes meta-box, select the the Homepage Template
Set your desired options from the Stoked! Homepage Options meta-box
Setting anything different that Inherit Global Settings will override the equivalent option set through WordPress Customizer. Each option will be explained in greater details in the Customizer section.
Hit the Publish button to save the page.
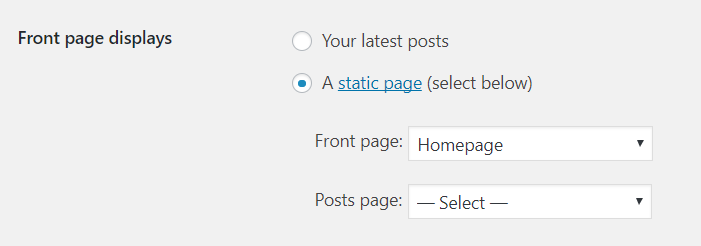
Move to Appearance → Reading
In Front Page Displays, set A Static Page and select the newly created page as Front Page. You don’t need to set up anything as Posts Page
Save Changes
You can create as many homepage-like pages as you want, this setting is only meant to tell WordPress which page you want to use when visiting yourdomain.com
Customizer Settings
Stoked! uses all best coding standards and practices, that’s why for this theme we decided to exclusively use the native and powerful WordPress Customizer to customize it, instead of adding additional heavy options panels.
To access the Customizer move to Appearance → Customize
In this section, we’ll loop through all the options which are specific to Stoked! It won’t cover all native Customizer settings which are parts of WordPress itself.
Fixed Width Container:
Sets the main container to a max width of 1200px. The width will still adjust for to adapt to smaller screens (responsiveness).
Full Width Container:
The main container will always try to fill the entire width of the browser window.
* This setting can be overridden for specific posts in the post editor page > Stoked! Visual Options or when creating a page using the Homepage template.
Sidebar Positioning
Right (default): Sets the content on the left and sidebar on the right. In this case the sidebar to populate with widgets would be the Left Sidebar.
Left:
Sets the content on the right and sidebar on the left. In this case the sidebar to populate with widgets would be the Right Sidebar.
Both: Sets the content on the center and two sidebars on the left and on the right. In this you’d need to populate with widgets both the Right Sidebar and the Left sidebar.
None: No sidebar will be shown.
* This setting can be overridden for specific posts in the post editor page > Stoked! Visual Options or when creating a page using the Homepage template.
Defines colors for links for the three main states (main, hover, active).
Please note that this will only affect links on white backgrounds, as links color contained on customizable backgrounds are auto-generated (light when a dark background is selected and vice-versa).
Main navigation background can be set separately in the Navigations section.
Select your preferred slider layout between the Default one, Giant or Classic style.
Select Your Query
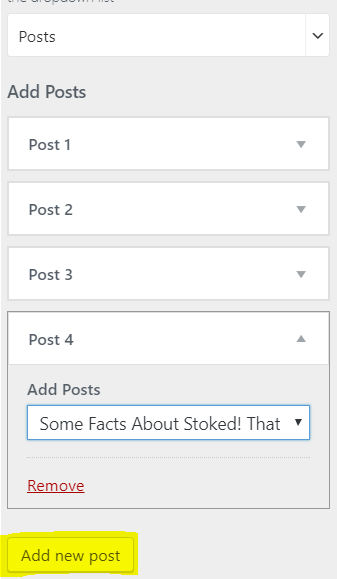
Posts:
Allows to select individual posts to be featured in the slider. When selecting this option you need to click the “Add Post” button in order to select and add a new post from the dropdown. Posts order can be re-arranged anytime by dragging and dropping post blocks.
Categories: Select this option to feature entire categories instead.
After selecting this option you need to click the “Add new Category” button to define one or multiple categories to be featured.
Max Posts Count:
Defines the maximum number of posts to feature in the slider.
Items at once: Defines how many items (posts) to show for each slide.
Playing around with this feature and combining it with different slider styles, can lead to very different visual results!
Have a look the at live demo → Features → Slider Examples to check some of the possibilities out.
* This setting can be overridden for each page when using the Homepage template.
Replaces the “Trending Now” text to something of your choice.
Add Categories
Defines which categories or category should be pulled to the news ticker. Click the Add Category button to define and select a new category from the dropdown menu. Posts will be shown in chronological order.
Post Count
Defines how many posts titles to pull from the selected category/categories in the news ticker.
Infinite Scroll
Enables / Disabled infinite scroll feature. The number of posts to load each time is taken from native WordPress setting in Settings > Reading > Blog pages show at most.
Auto-load Triggers
This useful option defines how many times to load posts automatically before showing the button to Load More Posts button, which requires user action.
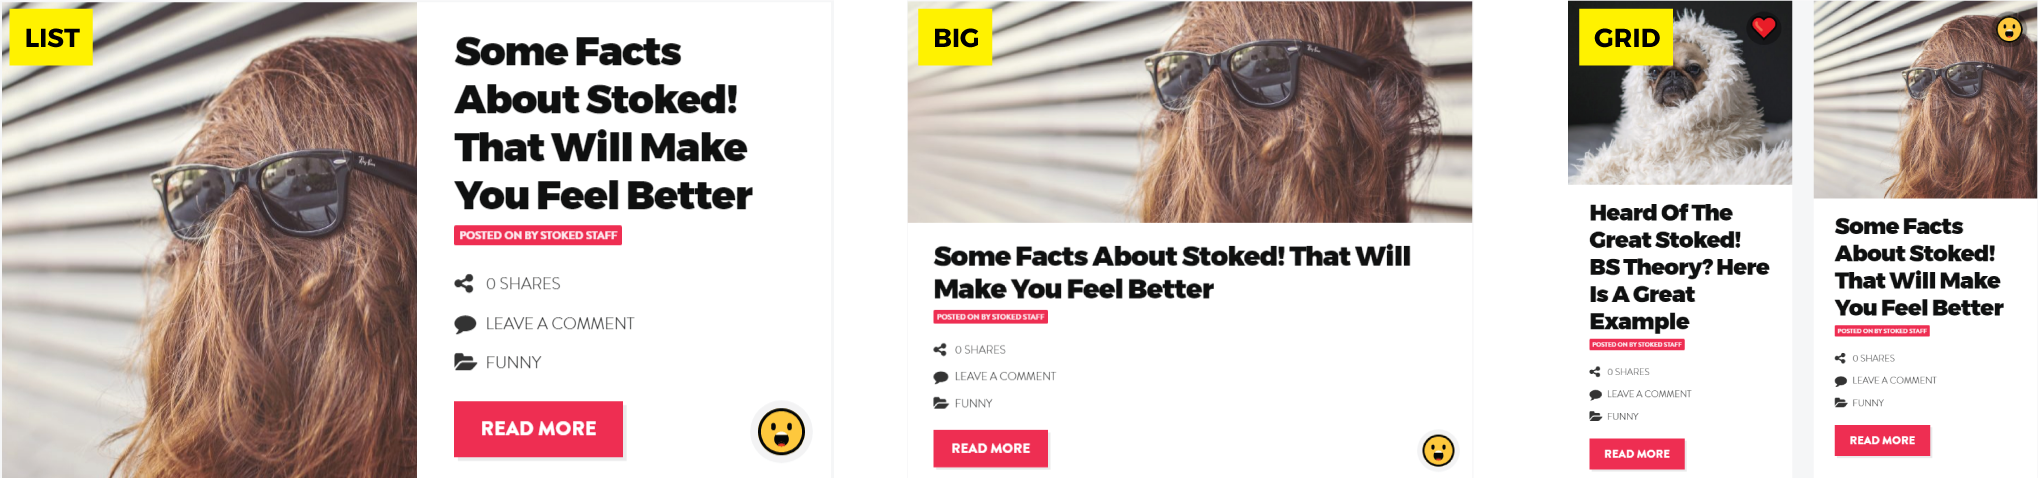
Defines the global setting for single posts layout.
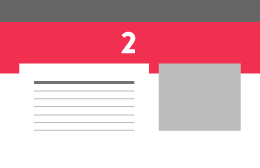
Layout 1 – SideInfo Default This is the default Stoked! layout. It will display the post meta on the side and a regular size featured image.
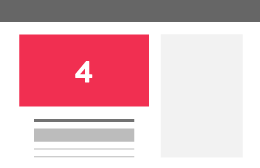
Layout 2 – SideInfo Full Media Displays posts meta on the sidebar, with a bigger featured image placed as a background.
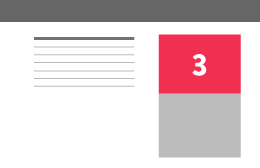
Layout 3 – Side Info and Media Displays both posts meta and featured image on the sidebar.
Layout 4 – Classic A more classical style, with a regular sized featured image and post meta below that.
Please note that if you combine layouts 1-2-3 it with a sidebar-less layout meta won’t display!
* This setting can be overridden for specific posts in the post editor page > Stoked! Visual Options or when creating a page using the Homepage template.
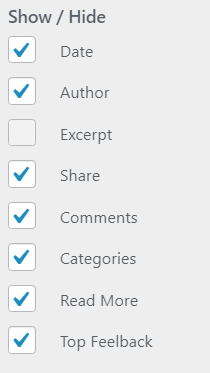
Dropcap Enable / Disable the dropcap feature (big first letter).
Author Box Enable / Disable the author bio at the end of the post.
Next Previous Stories Enable / Disable the “next article/previous article” feature at the end of the post.
Click the “Open Editor” button to enter any custom CSS code.
Custom Javascript/jQuery
Click the “Open Editor” button to enter any custom Javascript/jQuery code.
Unload Default Emoji
WordPress natively loads emoji related files on all posts and pages of your blog. Most users don’t need this. If you’re one of them, disable this option to unload all emoji-related resources and decrease loading times. Please note this has nothing to do with Stoked! Feelbacks feature.
To create a regular page instead, move to Pages → Add New. Other than native WordPress options, Stoked! adds a few templates to work with. You can select it through the Page Attributes → Template meta-box
The available templates are:
Blank Template This will be a completely blank page (no menus, sliders etc, whatsoever).
Empty Page Template This will be a blank page with main elements present. Such as menus and footer.
Please Note: changing page template will override global settings set through the Customizer. Leave the Default template active in order to use your global settings.
Post Options
Creating an article with Stoked! is same as most of themes, with some additional option available. Every option set in the post editor page will override the equivalent global option set through the Customizer for the specific post.
Let’s loop through them:
Post Layout
Will set the layout for this specific post, check the Single Post section for more details
Hide Featured Image
This option will hide the featured image on the article page, you can still upload a featured image, it will be used as a thumbnail for the post preview throughout the site. [ example ]
Social Share Position
This option will define where to display social sharing buttons inside the post.
Sidebar
This option will define the post layout. Check Theme Layout section for more details.
Post Formats
Video
If you want to show a video instead of an image on the post page, this is the post format to select.
When selecting it the following meta-box will appear:
Video File Select this option if you want to upload a video from your hard drive (self-hosted video).
Video Embed Code If you want to feature a video from an online source such as YouTube, Vimeo or DailyMotion, this is where you need to enter the embed code. You can usually get it from the sharing options on the desired video page, it will look something like this:
Select this option if you want to embed an audio file to your post. When selecting it a new meta-box will show, which has the same inputs as the Video meta-box.
Audio File Select this option if you want to upload an .mp3 file from your hard drive (self-hosted audio).
Audio Embed Code If you want to feature a video from an online source such as SoundCloud, this is where you need to enter the embed code. It will look something like this:
Stoked! comes with several built-in custom widgets. To setup a widgetized area, navigate to Appearance → Widgets and use the WordPress drag and drop interface to drop widgets into the desired widgetized areas.
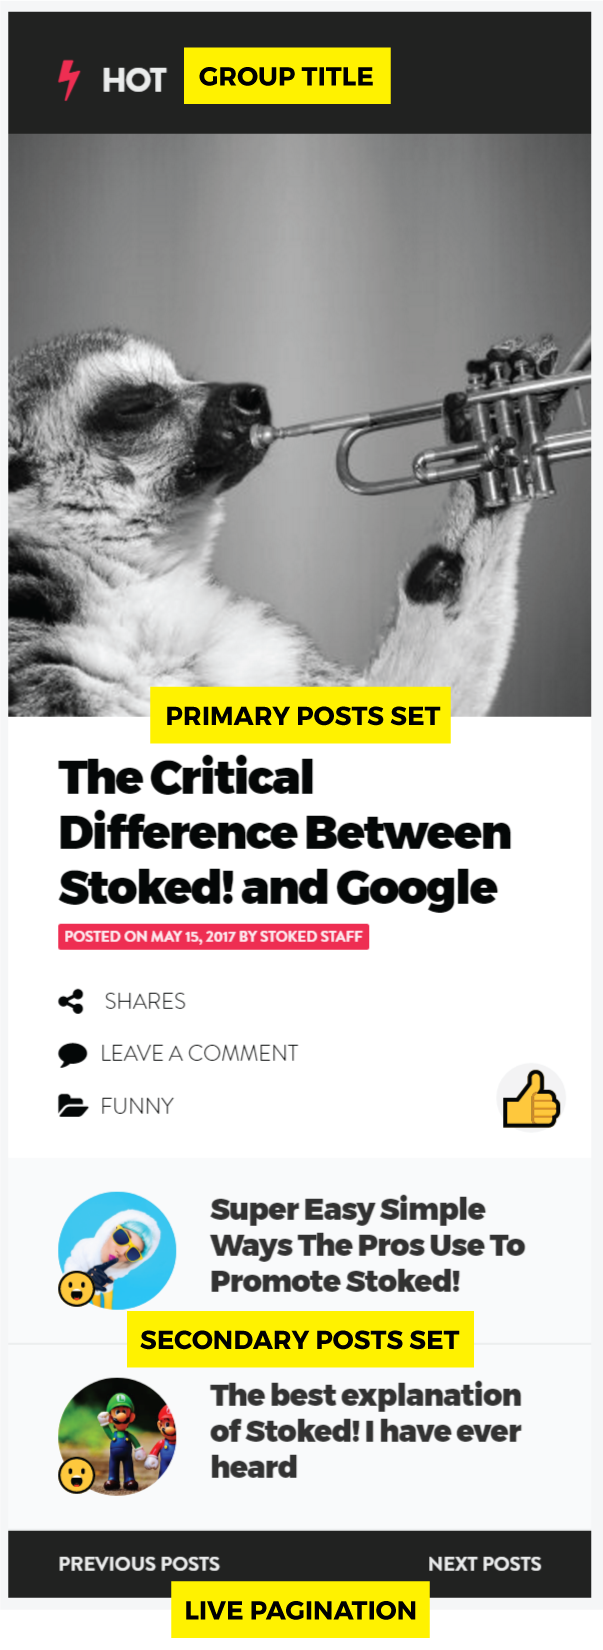
Cards Widget
This widget will display latest posts and reviews for a specific category (or all categories). You can set a group title, that represents the content you are displaying, and set the maximum number of posts to show and a bunch of self-explaining other options.
Side Posts
Displays posts filtered by Recent / Most Shared. Great to show off posts in sidebars in a simpler way
Ads Widgets (single and double)
The Ads widget lets you place Ads in your pages. You can display ads through an Ad code, such as Google AdSense, or upload and link an image yourself. HTML is supported.
For instance, to load a custom image, something like this would be enough:
<img src="http://yourdomain.com/yourimage.png" />
Facebook Page This widget adds the official Facebook Like box in your sidebar. You only need to enter your Facebook page URL. (e.g. http://www.facebook.com/facebookuser)
Flickr This widget grabs the latest pics from a Flickr account. Enter the User ID of the desired account, if you don’t know it just hit the Find it here link and follow the instructions. You also need to set how many pics you want to display.
Video Embed This widget lets you embed videos from YouTube, DailyMotion or Vimeo directly into your sidebar. Just enter the desired Video ID.
Example link: http://www.youtube.com/watch?v=UxpWpv3_pNc
Just Enter: UxpWpv3_pNc
Tag Based Carousel Displays a nice carousel of posts sharing the selected tag.
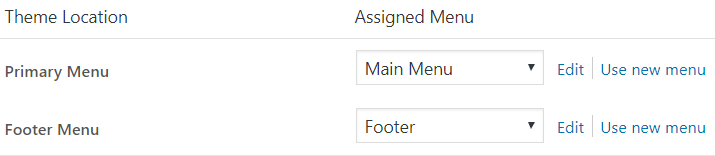
Menus
Stoked! supports two menu locations. Main menu and Footer menu. To set them up:
Move to Appearance → Menu and click Create New Menu
Create your menus
Click Manage Locations
Assign your menus to the desired locations.
Please Note: Main menu will support up to 2 levels depth. While Footer menu has no depth.
Stoked! Feelbacks
Installation
When activating Stoked!, you’ll get prompted to install a few recommended plugins. Stoked! Feelbacks is among them. Alternatively you can install it through Appearance → Install Plugins
Updating the plugin
After Stoked! theme update, if a new version of the plugin is available, you will be asked to update it through a notice in your dashboard. Alternatively you can check if there’s any new version available by moving to Appearance → Install Plugins.
Setting up Feelbacks
Stoked! Feelbacks plugin allows users to tag posts with some nice emoji or emoticons of any kind (technically any image/icon could be used), and successively let users express their own feedback by choosing through the available feelbacks previously set up.
To set up your own feelbacks:
After activating the plugin, move to Posts → Stoked! Feelbacks
Enter a Name for your new feelback
Choose an icon from available sets or upload your own
Optionally enter a Slug and a Description
Enter a number inside Order field to affect the order in which feelbacks will be displayed (optional)
Hit Add New Feelback button
Repeat steps 2-6 to add more.
In the end, it will look something like this:
Note: you’re note forced to name the feelback same as the icon name.
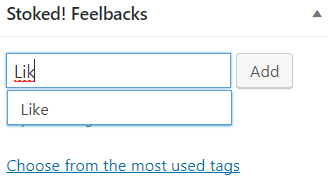
Tag a post
Assigning a Feelback is pretty much the same as adding regular tags to a post. The only difference is that is advisable to only chose one feelback per post, as only the most voted feelback will be shown on post previews.
In the post editor look for the Stoked! Feelbacks meta-box
Start typing in the name of the feelback, you’ll get suggestions when a match is found.
Click the Add button
Fake Counter
Fill the Fake feelbacks count option in order to start the count from another base rather than a depressing 0.
Feelbacks Menu Bar
Feelbacks nav che be enabled / disabled in Appearance → Customizer → Navigations → Feelbacks Nav
Other Plugins
WP-SCSS
This is the only required plugin, please install and activate this when prompted to do so. All settings will be automatically populated when activating the plugin with Stoked! theme active.
Mashshare Share Buttons
Installation
The plugin is integrated into the theme. You will be asked to install it upon theme activation. That doesn’t mean you need to use this specific plugin. If you prefer other social sharing solution, feel free to use it.
Setup
After activating the plugin, its configuration page will be accessible in the WP Admin main menu.
For more information, please refer to the plugin page.
How to Update?
As any other plugin from wordpress.org site, if new version of the plugin is available, you will be notified about it.
Options Relative to Stoked! Integration
When using the plugin with Stoked!, design options in Mashare → Settings → Visual won’t have any effect as the theme is responsible on handling this. Also all main settings will already be set when activating the plugin whit Stoked! theme active. Hence is advisable not to touch Visual settings.
Social buttons position can be adjusted in the post editor page → Stoked! Visual Options → Social Share Position
Networks Desired sharing buttons and their order can be set in Mashare → Settings → Networks. Stoked! adds Pinterest and Google in addition to the default ones.
Photoswipe
Install the plugin if you want to automatically add a nice and responsive lightbox effect for images out of the box.
Q2W3 Fixed Widget
Install the plugin if you want to add the ‘fixed widget’ feature. A new checkbox called ‘Fixed Widget’ will appear as an option on each widget. For best results is advisable to only enable it on the last widget of a sidebar though.
If you have any questions that are beyond the scope of this help file, please feel free to open a ticket on the dedicated support site and we’ll be glad to help you out!
PLEASE DO NOT USE THEMEFOREST COMMENT SECTION FOR ANY AFTER-SALE QUERY, YOU’D BE REDIRECTED TO THE SUPPORT SITE ANYWAY ENDING UP LOSING TIME.
Just before that, please make sure you know that:
Support for my items includes:
Responding to questions or problems regarding the item and its features
Fixing bugs and reported issues
Providing updates to ensure compatibility with new software versions
Item support does not include:
Customization and installation services
Support for Not Popular third party software and plug-ins
Before seeking support, please:
Make sure your question is a valid Theme Issue and not a customization request.
Make sure you have read through the documentation and any related guide or FAQ before asking support on how to accomplish a task.
Try disabling any active plugins to make sure there isn’t a conflict with a plugin.
If you have customized your theme and now have an issue, back-track to make sure you didn’t make a mistake.
Almost 80% of the time we find that the solution to people’s issues can be solved with a simple “Google Search”. You might want to try that before seeking support. You might be able to fix the issue yourself much quicker than we can respond to your request.


Social Accounts
Social Accounts in Header
Enables / Disables completely social buttons in the navigation bar.
Label
Defines the text appearing on the button before hovering it (e.g. Follow Us! )
*Social Media Name* URL
Enter your account URL for each social media you want to show (e.g: https://twitter.com/_djwd).